2.1. Atalas200DK简明教程
2.1.1. 简介
硬件配置
Atalas200DK是华为开发的一款基于昇腾AI处理器Ascend 310的开发套件, 功耗低体积小, 适合于移动嵌入式场景应用. 下 表 2.1 给出了华为 Atalas200DK 与比特大陆 Mini Box SE3 硬件配置对比, 可知华为Atlas200DK开发套件性能要优于比特大陆Mini Box SE3.
参数 |
华为Atlas200DK |
比特大陆 Mini Box SE3 |
|---|---|---|
芯片型号 |
华为Ascend 310 |
比特大陆BM1682 |
AI算力 |
|
|
内存 |
LPDDR4x, 8GB, 3200Mbps |
8GB |
存储 |
1个Micro SD卡, 支持SD3.0, 最高支持速率SDR50, 最大容量2TB |
EMMC 32GB, 支持SD扩展 |
网络接口 |
1个GE RJ45 |
1 x Gigabit |
USB接口 |
1个USB3.0 Type C接口, 仅作为从设备, 兼容USB2.0 |
—— |
其它接口 |
1个40pin IO连接器, 2个22pin MIPI 连接器, 2个板载麦克风 |
—— |
电源 |
5V~28V DC, 默认配置12V 3A适配器 |
12V DC |
结构尺寸 |
137.8mm x 93.0mm x 32.9mm |
210mm * 115mm * 45mm |
功耗 |
20W |
平均60W, 最大90W |
重量 |
234g |
—— |
工作温度 |
0℃~ 35℃ |
-10℃ ~ 55℃ |
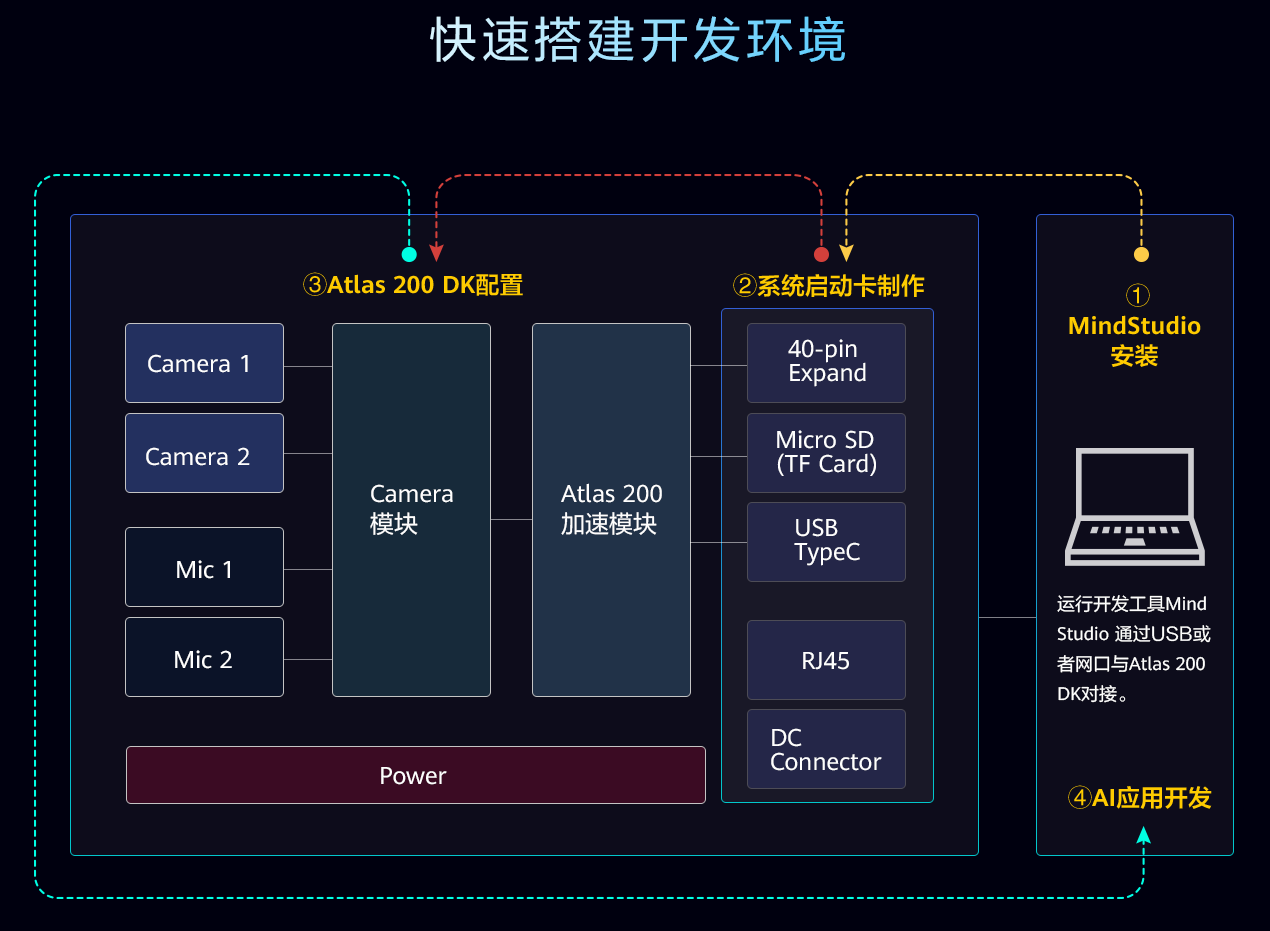
Atlas200DK 主要包含Ascend 310 AI加速模块、图像/音频接口芯片 (Hi3559C) 和LAN Switch三部分, 系统架构如 图 2.5 所示.
软件配置
资料汇总
文档中心 : Atlas200DK
软件工具 : 含制卡工具, MindSpore Studio, DDK 等, 注, 以下涉及的软件请换成最新版本
1.3Atlas GITEE仓库 : Samples, Custom Operator
操作系统获取路径 : Ubuntu 16.04.3
注解
目前开源的Ascend芯片上的模型有:
分类: alexnet, caffenet, car_color, car_plate_recognition, car_type, densenet, dpn98, face_attribute, face_emotion, feature_extract, googlenet, inception_age, inception_gender, inception_v2, inception_v3, inception_v4, mobilenet_v1, mobilenet_v2, pedestrian, resnet101, resnet152, resnet18, resnet50, sphereface, squeezenet, vanillacnn, vgg16, vgg19
检测: car_plate_detection, face_body_detection, face_detection, faster_rcnn, faster_rcnn_vgg16, mobilnent_ssd, occlusion_face_detection, peppapig_detection, resnet_ssd, vgg16_ssd, vgg_ssd, vgg_ssd_voc0712, yolo_v2
2.1.2. 环境配置
准备
编译依赖
通过如下命令安装编译依赖
0 | sudo apt-get install gcc g++ cmake curl libboost-all-dev unzip haveged libatlas-base-dev python-skimage python3-skimage python-pip python3-pip liblmdb-dev libhdf5-serial-dev libsnappy-dev libleveldb-dev make graphviz autoconf libxml2-dev libxml2 sqlite3 python libzip-dev libssl-dev
|
MindSpore Studio安装
以下假设工作主目录为 Atlas200, 含如下两个文件
mini_mind_studio_Ubuntu.rar
MSpore_DDK-1.3.T34.B891-x86_64.ubuntu16.04-aarch64.ubuntu16.04-aarch64.ubuntu16.04.tar.gz
解压 mini_mind_studio_Ubuntu.rar 软件包, 并将压缩包 MSpore_DDK-1.3.T34.B891-x86_64.ubuntu16.04-aarch64.ubuntu16.04-aarch64.ubuntu16.04.tar.gz 放进解压目录 mini_mind_studio_Ubuntu.
准备工作
配置可选项
打开文件 scripts/env.conf
设置IP, 端口等变量值, 安装用户, 举例如下
0 1 2 3 4 5 6 7 8 9 10
ip=192.168.31.233 port=8087 toolpath=/yourdir/Atlas200/tools backup=/yourdir/Atlas200/wsbackup profiler_port=8099 max_log_size=10 apache_user=msvpUser install_user=ant package_path=/usr/bin use_eth0=true load_data=true
执行安装
执行如下命令安装
1 2 3 4 5 6 7 8 9 10 11 12 13 14 15 16 17 18 19 20 21 22 23 24 25 26 27 28 29 30 31 32 33 34 35 36 37 38 39 40 41 42 43 44 45 46 47 48 49 50 51 52 53 54 55 56 57 58 59 60 61 62 63 64 65 66 67 68 69 70 71 72 73 74 75 76 77 78 79 80 81 82 83 84 85 86 87 88 89 90 91 92 93 94 95 | bee@Smart:~/sfw/huawei/mini_mind_studio_Ubuntu$ sudo ./add_sudo.sh bee
[sudo] password for bee:
bee@Smart:~/sfw/huawei/mini_mind_studio_Ubuntu$ ./install.sh
files check pass!
[INFO] Please make sure that you have configured in env.conf otherwise the installation will use default configuration.
[INFO] Your ip address is 192.168.49.189
[INFO] Using port: 8888
[INFO] Using tool_path: /home/bee/tools
[INFO] Using backup_path: /home/bee/wsbackup
[INFO] Using profiler_port: 8099
[INFO] Using apache_user: msvpUser
[INFO] Mind-Studio package found: Mind-Studio_Ubuntu-x86-64.tar
[INFO] DDK package found: MSpore_DDK-1.3.T34.B891-x86_64.ubuntu16.04-aarch64.ubuntu16.04-aarch64.ubuntu16.04.tar.gz
[INFO] Extracting package, please wait for a minute...
[INFO] Start installing Mind-Studio
#### The current system is ubuntu 16.04.
install user: bee
Accept use_eth0 successfully!
Accept load_data successfully!
Accept run_type successfully!
start check profiling pre-install software
四 29 8月 2019 20:47:49 [INFO] [MSVP] [22906] install_profiling.sh: Current user is bee.
===> Start install mongodb
===> Successfully installed the mongod.
===> Started to prepare conf.
===> Successfully prepared conf.
===> Started to prepare rebootshell.
===> Successfully prepared rebootshell.
/etc/init.d
===> Started to prepare envtools
===> Started to import gnupg key.
===> Successfully imported gnupg key
===> Successfully prepared envtools
===> Copy libCaffe
/home/bee/sfw/huawei/mini_mind_studio_Ubuntu/Mind-Studio/vendor/envtools
===> Copy ArmPython
===> Started to prepare Mind_Studio_Project.
openjdk version "1.8.0_222"
OpenJDK Runtime Environment (build 1.8.0_222-8u222-b10-1ubuntu1~16.04.1-b10)
OpenJDK 64-Bit Server VM (build 25.222-b10, mixed mode)
===> Successfully prepared Mind_Studio_Project
===> No projects need to be loaded.
===> No my-datasets need to be loaded.
===> No my-model needs to be loaded.
===> No caffe-model need to load
===> No db needs to be loaded.
===> No offline-model needs to be loaded.
===> Successfully installed the environment
Your time zone 20:49:01 is not a common time zone, Please check if the jvm virtual machine time zone matches.
===> Installing the DDK...
MSpore_DDK-1.3.T34.B891-x86_64.ubuntu16.04-aarch64.ubuntu16.04-aarch64.ubuntu16.04.tar.gz
===> Starting to extract ddk.
===> Installing the DDK...
===> Successfully installed the DDK.
===> Write DDKConfig successfully!
checking the JCE in JDK ...
===> Remove DDKConfig successfully!
===> Write DDKConfig successfully!
start to check certificate expire days...
==> Certificate /home/bee/tools/conf/secure_keys/server.crt will sleep 365d!
set ulimit -n 64000
./logs/
./logs/operation.log
./rootkey/
./rootkey/v1/
./rootkey/v1/cat/
./rootkey/v1/cat/c.txt
./rootkey/v1/apple/
./rootkey/v1/apple/a.txt
./rootkey/v1/dog/
./rootkey/v1/dog/d.txt
./rootkey/v1/boy/
./rootkey/v1/boy/b.txt
./work_key.json
about to fork child process, waiting until server is ready for connections.
forked process: 24944
child process started successfully, parent exiting
===> Successfully started the mongod server.
===> mongo password has been initialised, please change password in time. you can refer to instruction manual for help
Total number of files is 0
===> Starting Mind Studio...Please wait.
Server startup in 19688 ms
/home/bee/tools/log
===> Successfully started Mind Studio.
===> Use Google Chrome https://IP:Port
===> You can check /home/bee/tools/log/mind_log/mind-20190829204746.log for installation details!
the install path is not in PATH, add it to PATH.
===> Waiting for profiling to finish...
===> Successfully installed profiling.
Starting to chmod folders.
Installation finished.
[INFO] delete temporary Mind-Studio directory.
/home/bee/sfw/huawei/mini_mind_studio_Ubuntu
[INFO] Please make sure that the Linux Kernel Version is higher than 4.18 or apply this patch https://bugzilla.kernel.org/attachment.cgi?id=277305 when Linux Kernel Version below 4.18, otherwise maybe stuck when converting model using omg with TE plugin.
[INFO] Install successfully
|
提示
若安装过程提示 mongo 安装启动失败, 可以通过 sudo apt install mongodb-server 直接安装.
安装完成后在浏览器中输入上述 https://IP:port 地址, 如可以进入登录界面 (图 2.6), 则证明安装成功, 否则重复上述步骤
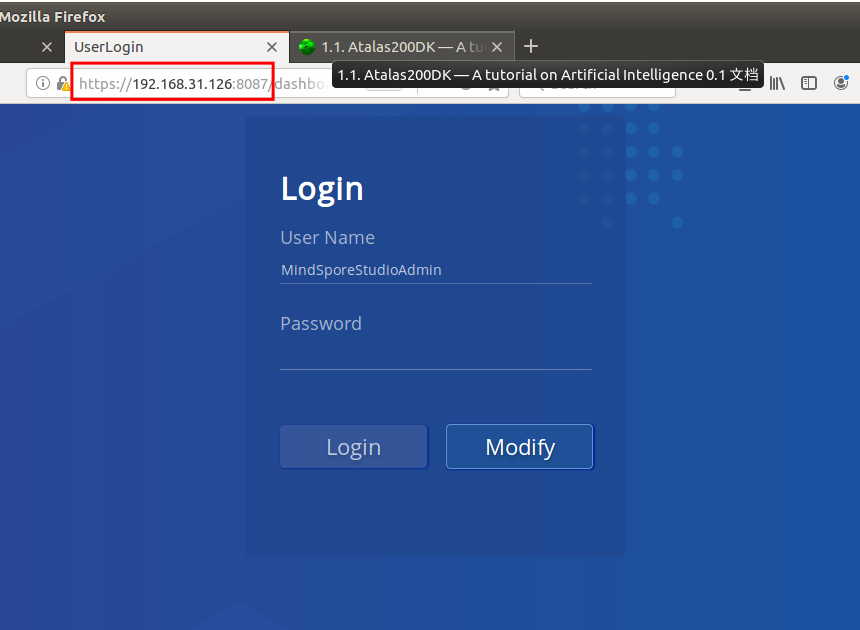
图 2.6 MindSporeStudio 登录界面
提示
登录MindSpore Studio界面的用户名默认为“MindSporeStudioAdmin”, 不支持修改和新建. 初始密码为“Huawei123@”, 请参见修改密码. 登录Profiling界面的用户名为msvpadmin, 初始密码为Admin12#$, 请参见展示性能分析数据章节创建普通用户.
登录成功后即可进入Mind Spore Studio 工作界面 (图 2.7)
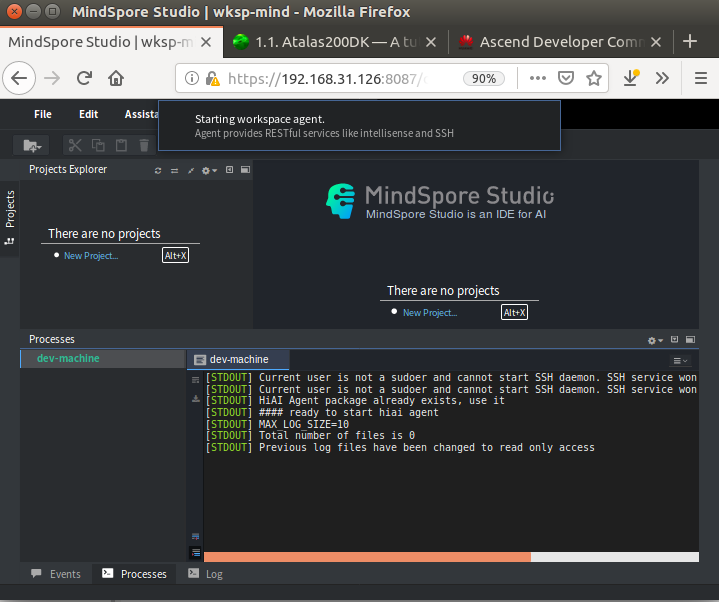
图 2.7 MindSporeStudio 工作界面
2.1.3. 系统启动
SD卡启动镜像制作
准备工作
- 硬件环境
一张MicroSD卡, 大于16GB
一台装有PC机
- 软件环境
PC机装有
ubuntu-16.04.3-desktop/server-amd64,MindSpore Studio,DDK嵌入式操作系统
ubuntu-16.04.3-server-arm64.iso, 可通过命令axel -n 10 -o ./ http://old-releases.ubuntu.com/releases/16.04.3/ubuntu-16.04.3-server-arm64.iso下载开发套件
mini_developkit-xxx.rar脚本文件
make_sd_card.py和make_ubuntu_sd.sh, 可从 GIT 仓库 获取.
新建文件夹 mksd (如 Atlas200/ascend/mksd), 将 ubuntu-16.04.3-server-arm64.iso, mini_developkit-xxx.rar, make_sd_card.py 和 make_ubuntu_sd.sh 放入该文件夹, 准备工作完成.
依赖安装
打开终端, 输入如下命令安装依赖
0 1 | su - root
apt-get install qemu-user-static binfmt-support python3-yaml gcc-aarch64-linux-gnu g++-aarch64-linux-gnu
|
配置Atlas200DK开发板IP地址
修改文件 make_sd_card.py 中的参数值, 使其不与PC机冲突
# 网卡IP地址, 通过网线连接时使用
NETWORK_CARD_DEFAULT_IP="192.168.31.2"
# USB虚拟IP地址, 通过USB连接时使用
USB_CARD_DEFAULT_IP="192.168.31.2"
警告
实测发现, IP 192.168.x.y 中, y 只能为 2, 设置成其它值无法ping同!
提示
注意, 上述IP地址应与PC机处于同一网段内. 若想重新制卡, 需要先删除上述操作生成的SD卡上的分区, 可以通过 sudo apt install gparted 安装 Gparted 分区工具, 然后执行删除分区的操作即可.
制作SD卡启动镜像
进入 Atlas200/ascend/mksd/ 目录, 执行命令 python3 make_sd_card.py local /dev/sdx 制作SD卡, 注意 sdx 中的 x 代表SD卡号, 可使用 sudo fdisk -l 查看, 输出日志如下
打开终端, 输入如下命令安装依赖
0 1 2 3 4 5 6 7 | mksd# su - root
mksd# python3 make_sd_card.py local /dev/sdc
Begin to make SD Card...
Please make sure you have installed dependency packages:
apt-get install -y qemu-user-static binfmt-support gcc-aarch64-linux-gnu g++-aarch64-linux-gnu
Please input Y: continue, other to install them:y
Step: Start to make SD Card. It need some time, please wait...
Make SD Card successfully!
|
提示
若提示: [ERROR] Can not get disk, please use fdisk -l to check available disk name!
首先检查是否输错 sdx, 若无执行 sudo python3 make_sd_card.py local /dev/sdx.
连接开发板与上位机
可以通过 Type-c 或网线连接, 可以直连, 也可以通过交换机/路由器相连, 保证开发板IP与PC机IP处于同一网段即可.
小技巧
在执行配置前, 建议先进行设备检查, 即通过 Type-c 线连接开发板与PC机, 在PC机中执行 ifconfig -a 查看是否有新的网卡设备, 若有, 证明上述制卡过程没问题, 否则很可能是嵌入式系统ubuntu版本不对, 或者是开发套件 mini_developkit-xxx.rar 版本不对, 实验发现, Ascend tool 仓库 中文件夹 B883 下的软件包做成镜像无法发现设备, 而 B750SP05 下的则可以.
无论使用USB连接还是网线连接, 均需要配置服务端静态IP, 可通过图形界面配置, 或者在PC端执行如下命令
0 1 2 3 4 5 6 7 8 9 10 11 12 13 14 15 16 17 18 19 20 21 22 23 24 | mksd# su - root
# open file /etc/network/interfaces
sudo gedit /etc/network/interfaces
# add the following information
auto ethname
iface ethname inet static
address xxx.xxx.xxx.xxx
netmask 255.255.255.0
# modify file /etc/NetworkManager/NetworkManager.conf to enable the above settings permanently
sudo gedit /etc/NetworkManager/NetworkManager.conf
# set managed=true
managed=true
# USB
ifdown ethname
ifup ethname
service NetworkManager restart
# NIC restart network service
service networking restart
service NetworkManager restart
|
其中, ethname 为网卡名, 通过 ifconfig 查看, 举例如下
0 1 2 3 4 | # enp0s20u2
auto enp0s20u2
iface enp0s20u2 inet static
address 192.168.31.233
netmask 255.255.255.0
|
重启网络服务后, 可通过 ifconfig 查看对应网卡IP是否设置成功. 接着可以通过 ping 192.168.x.2 来测试是否连接成功, 其中 x 为在制作SD卡中设置的值!
登录开发板系统
由于通过网络连接开发板与PC机, 故可通过 ssh 协议访问, 若要登录开发板系统, 在PC端输入指令 ssh HwHiAiUser@IP (如 ssh HwHiAiUser@192.168.31.2 ) 即可, 默认HwHiAiUser密码为 Mind@123.
0 1 2 3 4 5 6 7 8 9 10 11 12 13 14 15 16 17 | bee@Smart:~$ ssh HwHiAiUser@192.168.31.2
HwHiAiUser@192.168.31.2's password:
Welcome to Ubuntu 16.04.3 LTS (GNU/Linux 4.19.36+ aarch64)
* Documentation: https://help.ubuntu.com
* Management: https://landscape.canonical.com
* Support: https://ubuntu.com/advantage
The programs included with the Ubuntu system are free software;
the exact distribution terms for each program are described in the
individual files in /usr/share/doc/*/copyright.
Ubuntu comes with ABSOLUTELY NO WARRANTY, to the extent permitted by
applicable law.
HwHiAiUser@davinci-mini:~$ ls
dump hdcd HIAI_PROJECTS ide_daemon
HwHiAiUser@davinci-mini:~$
|
2.1.4. MindSpore Studio开发
MindSpore Studio的Matrix流程编排功能提供AI引擎可视化拖拽式编程及算法代码自动生成技术, 极大的降低了开发者的门槛. Matrix中的Engine是一个具体的业务节点, 一个业务节点表示一次处理过程, 多个Engine组成一个Graph, Graph负责对Engine的管理. 每个Engine节点间的连接在Graph配置文件中配置, 节点间数据的实际流向根据具体业务在节点中实现, 通过向业务的开始节点灌入数据启动整个Engine计算流程. (引自华为官网)
开发概览
Mind Studio的Engine流程编排功能提供AI引擎可视化拖拽式编程及算法代码自动生成技术, 极大的降低了开发者的门槛. 其中, 最核心的步骤是编排流程, Mind Studio的Engine 编排流程如 图 2.8 所示, 该流程主要包含以下几个步骤:
模型转换:将Caffe/Tensorflow等模型转换为适配硬件环境的模型.
图像预处理:对数据进行特定的预处理, 比如将对信号进行时频变换, 或者需要对图片进行指定的裁剪、缩放、格式转换等操作, 以满足模型推理的需要.
模型推理:将预处理后的输入进行推理执行输出结果.
图像后处理:对数据进行特定的后处理, 比如将模型推理结果保存在文件中, 或者根据数据在图像上标注类别、概率、检测框等信息.
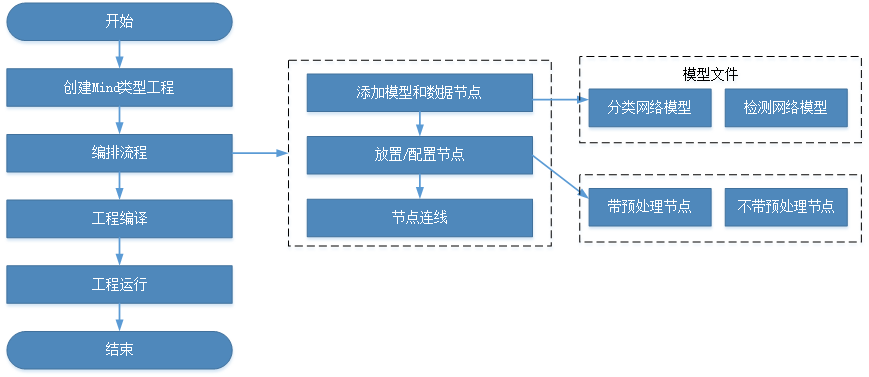
图 2.8 Engine编排总体流程(来自华为官网)
Engine开发详细流程可参考官方文档 Engine编排总体流程.
自定义算子
待续!
2.1.5. 深度学习移植实例
简单例子
MindSpore Studio的Matrix流程编排功能提供AI引擎可视化拖拽式编程及算法代码自动生成技术, 极大的降低了开发者的门槛. Matrix中的Engine是一个具体的业务节点, 一个业务节点表示一次处理过程, 多个Engine组成一个Graph, Graph负责对Engine的管理. 每个Engine节点间的连接在Graph配置文件中配置, 节点间数据的实际流向根据具体业务在节点中实现, 通过向业务的开始节点灌入数据启动整个Engine计算流程.
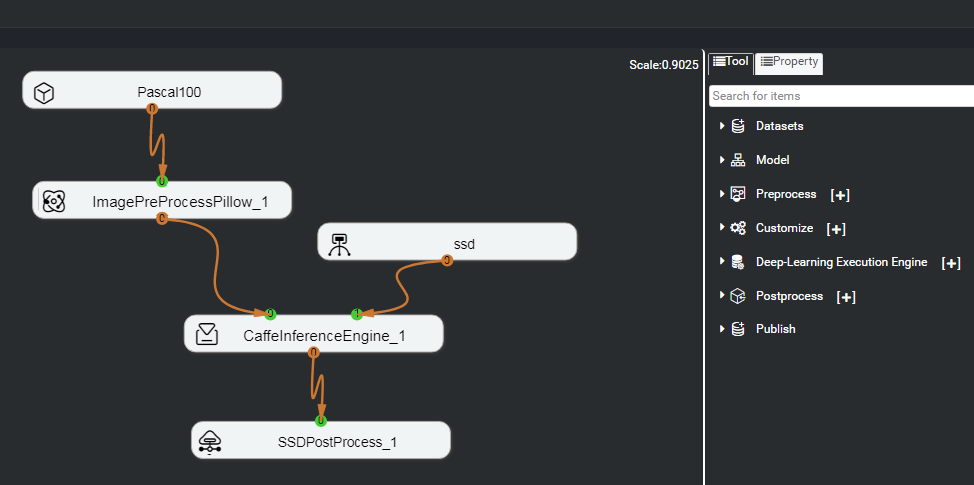
图 2.11 SSD300目标检测网络在Mind Studio工具上的编排结果
使用Mind Studio工具进行SSD300目标检测网络的编排, 这里使用的数据集为VOC数据集. 编排后的SSD目标检测网络流程如 图 2.11 所示, SSD网络主要包含如下节点: 一个数据集 (Pascal100) 、一个模型 (SSD) 、一个数据预处理 (ImagePreProcess) 、一个执行引擎 (MindInferenceEngine) 以及一个图片后处理节点 (SSDPostProcess). 通过编译生成Ascend 310人工智能芯片上的可执行文件 vgg_ssd_voc0712.om, 将该文件导入系统SD卡中即完成模型的移植工作.
